Overview
If you've worked with Claude Code for a while, you've probably seen this message in your terminal:
Tip: Use git worktrees to run multiple Claude sessions in parallel.
If you're already using worktrees to run multiple Claude sessions in parallel, great. You're already familiar with the concepts LaborForest builds upon.
If you're new to git worktrees, below is a surface-level overview:
- Git worktrees allow multiple branches of the same repository to be checked out in different directories simultaneously
- The same branch cannot be checked out in multiple worktrees at the same time
- Git worktrees do not require cloning the same repository more than once
- You can switch contexts and work on different things in parallel without affecting other branches
- Git worktrees have been built into Git since 2015, but AI coding agents are greatly popularizing their adoption
Git worktrees in practice
In practice, a development workflow can look something like this:
- Create a new branch or check out an existing branch for the feature or bug fix you're working on
- Plan your changes and kick off implementation using Claude Code
- While Claude Code works, create a new git worktree, on a new or existing branch, for another initiative
- In the new worktree's directory, plan your changes and kick off implementation using Claude Code
- Repeat steps 3 and 4 as much as you'd like
- When changes on a branch within a worktree are complete: commit and push the changes; open a pull request and remove the worktree
This allows you to switch between multiple Claude Code sessions on different branches within the same project, at the same time.
No more stashing changes to check behavior on another branch and no more abandoning current progress to tackle something more urgent.
Pain points
This works great in theory, but there's a part I glossed over above:
What if your repository requires some setup for the local development environment?
For some projects, this can just be a few commands you need to run per new worktree. For other projects, this can be a tedious sequence of steps, time that adds up and takes away from developer velocity.
Yes, you can write setup scripts for each project to address this. However, unless you have significant control over each repository, standardization can be difficult. You can easily end up with a collection of brittle bash spaghetti.
Take, for example, a Laravel project using Herd Pro for services. For each new worktree, you may need to:
- create an environment file from the example in the project
- update the environment file variables for just this worktree (to maintain isolation)
- create a local S3-compatible bucket for storage using MinIO
- create a new MySQL schema
- install composer dependencies
- install NPM dependencies
- build front-end assets
- link and secure the site in Laravel Herd
- seed the new database with test data
Then of course, when you are done with a worktree, you should tear down these resources too.
Introducing LaborForest
LaborForest is a completely free and open source desktop app for macOS to manage git worktrees and local action workflows.
With LaborForest, all the steps above can become a few clicks. You can easily spin up or tear down local development environments, coupled to git worktrees, and visually keep track of your worktrees and development state of each.
LaborForest in action
The below gif is a demonstration of using LaborForest for a local Laravel project.
The steps taken are:
- Create a new workspace for a new branch
feature/example, usingmainas the base branch - Set up a local development environment for the new workspace (LaborForest term for the combination of a worktree and branch)
- Observe the sequence of steps executing in realtime via a UI loosely inspired by GitHub Actions
- Open a browser using the new environment's
APP_URLto confirm the local site loads successfully
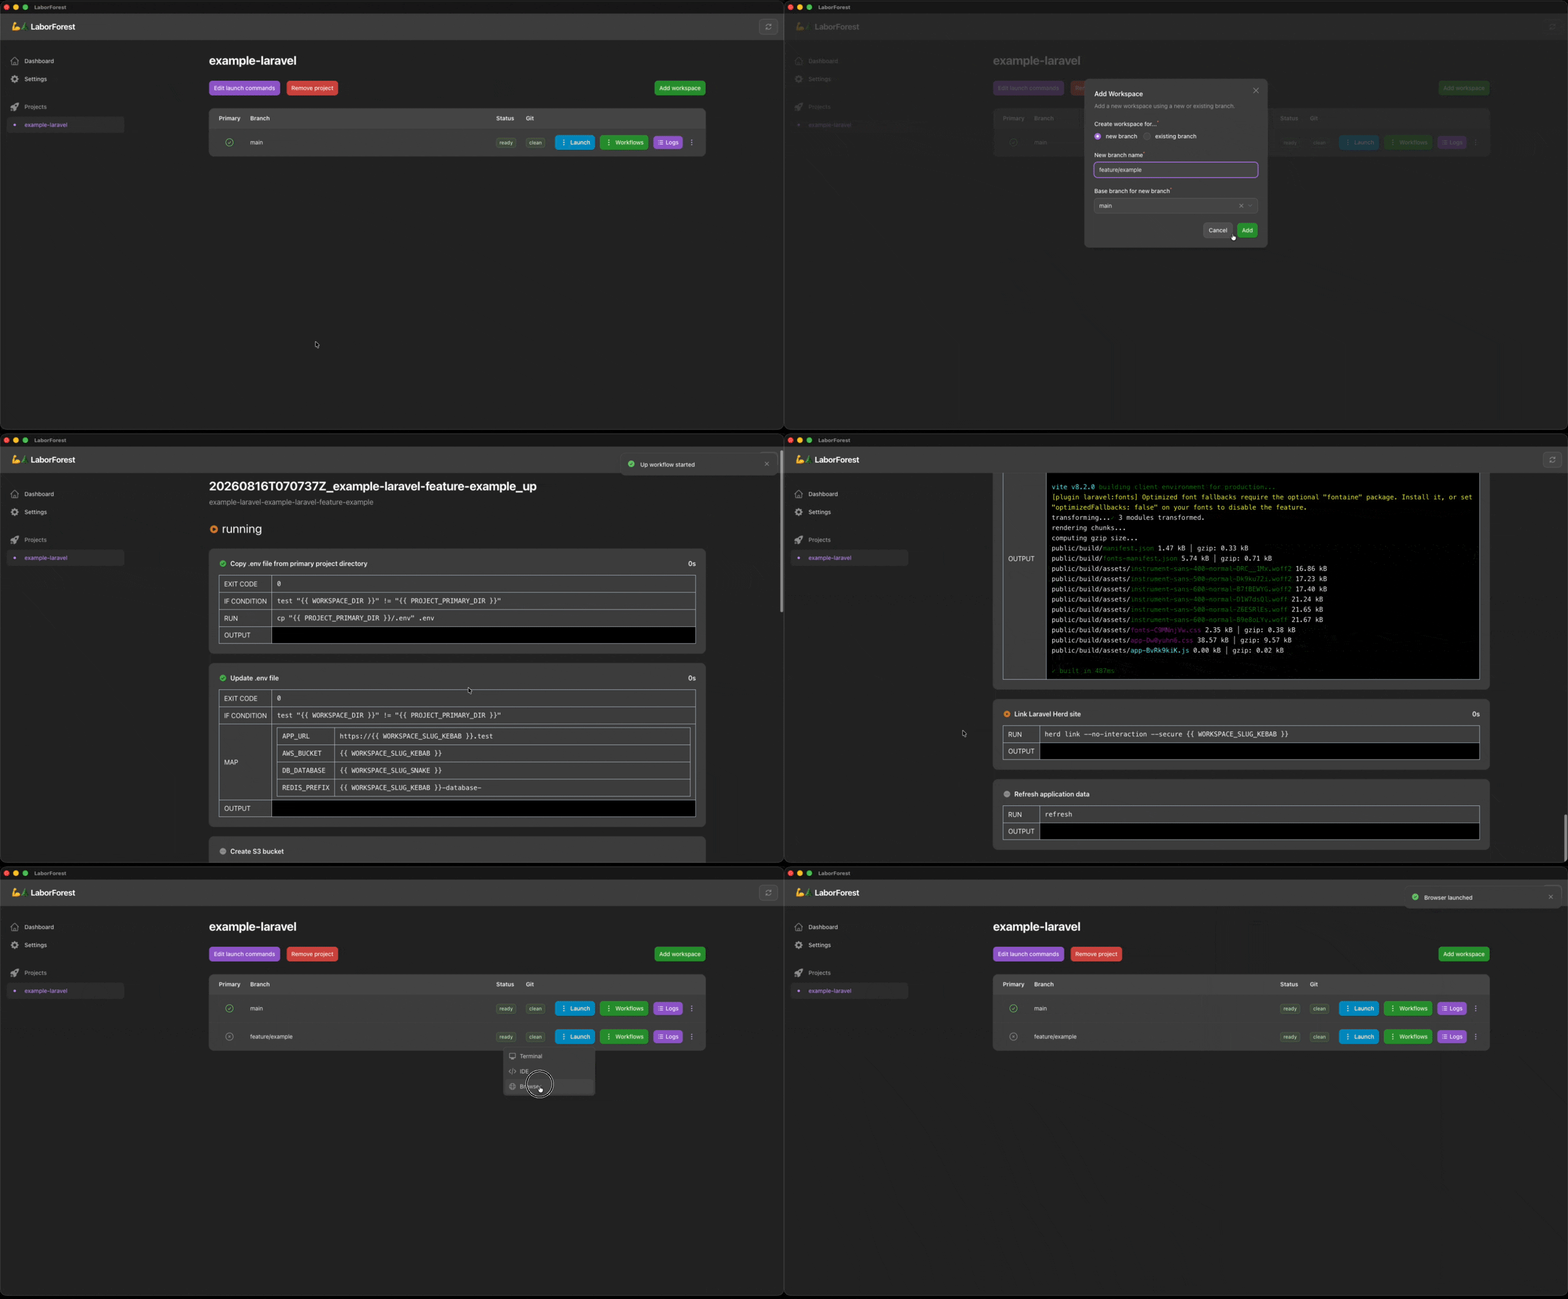
An example with Laravel
Let's dive into what was required to record the above gif.
Project assumptions
The demonstration above was with a newly generated Laravel project, configured to match my preferences and setup with Herd.
SESSION_DRIVERset toredisQUEUE_CONNECTIONset toredisREDIS_PREFIXset toexample-laravel-database-AWS_BUCKETset toexample-laravelAWS_ACCESS_KEY_IDset toherdAWS_SECRET_ACCESS_KEYset tosecretkeyAWS_URLset tohttp://localhost:9000/example-laravelAWS_ENDPOINTset tohttp://localhost:9000
You are free to customize your configuration and workflows as needed for your project.
Example workflows
Upon loading a project in LaborForest, a new directory is created at the root of your project: .laborforest.
It is up to you if you'd like to commit this directory or ignore it by adding the path to .git/info/exclude.
Workflows are .yaml files placed in the .laborforest/workflows directory within your project.
Each .yaml file describes:
- The status the workspace must be in to allow running the workflow (
suspended,ready, ornull) - The status the workspace will be in upon successful execution of the entire workflow (
suspendedorready) - Where in the list of workflows this specific workflow should appear (sort order)
- The list of steps the workflow executes when run
Workflows: up, refresh, and down
The example workflows for a Laravel project, shipped with LaborForest, are below.
up.yamlis the workflow used when spinning up a new local development environment for a new workspace- copies the
.envfile from the primary project directory (if workspace is not the primary workspace) - updates the
.envfile with workspace-specific configuration, for isolation (if workspace is not the primary workspace) - creates a local S3 bucket (if it doesn't already exist)
- creates the MySQL schema (if it doesn't already exist)
- installs composer dependencies
- installs NPM dependencies
- builds front-end assets
- links and secures the Laravel Herd site
- runs the refresh workflow below
- copies the
1resource_type: workflow 2require_status: suspended 3ending_status: ready 4sort_order: 0 5steps: 6 - name: 'Copy .env file from primary project directory' 7 type: shell 8 if: 'test "{{ WORKSPACE_DIR }}" != "{{ PROJECT_PRIMARY_DIR }}"' 9 run: 'cp "{{ PROJECT_PRIMARY_DIR }}/.env" .env'10 - name: 'Update .env file'11 type: update_env12 if: 'test "{{ WORKSPACE_DIR }}" != "{{ PROJECT_PRIMARY_DIR }}"'13 map:14 APP_URL: 'https://{{ WORKSPACE_SLUG_KEBAB }}.test'15 AWS_BUCKET: '{{ WORKSPACE_SLUG_KEBAB }}'16 DB_DATABASE: '{{ WORKSPACE_SLUG_SNAKE }}'17 REDIS_PREFIX: '{{ WORKSPACE_SLUG_KEBAB }}-database-'18 - name: 'Create S3 bucket'19 type: shell20 unless: 'aws --endpoint={{ ENV_AWS_ENDPOINT }} s3api head-bucket --bucket {{ ENV_AWS_BUCKET }}'21 run: 'aws --endpoint={{ ENV_AWS_ENDPOINT }} s3api create-bucket --bucket {{ ENV_AWS_BUCKET }}'22 env:23 AWS_ACCESS_KEY_ID: '{{ ENV_AWS_ACCESS_KEY_ID }}'24 AWS_SECRET_ACCESS_KEY: '{{ ENV_AWS_SECRET_ACCESS_KEY }}'25 AWS_DEFAULT_REGION: '{{ ENV_AWS_DEFAULT_REGION }}'26 - name: 'Create MySQL schema'27 type: shell28 run: 'mysql -h {{ ENV_DB_HOST }} -P {{ ENV_DB_PORT }} -u {{ ENV_DB_USERNAME }} $([[ -z "{{ ENV_DB_PASSWORD }}" ]] && echo "--skip-password" || echo "-p{{ ENV_DB_PASSWORD }}") -e "CREATE DATABASE IF NOT EXISTS {{ ENV_DB_DATABASE }} CHARACTER SET utf8mb4 COLLATE utf8mb4_unicode_ci"'29 - name: 'Install Composer dependencies'30 type: shell31 run: 'composer install -v --ansi --no-interaction'32 - name: 'Install NPM dependencies'33 type: shell34 run: 'npm ci'35 - name: 'Build assets'36 type: shell37 run: 'npm run build'38 - name: 'Link Laravel Herd site'39 type: shell40 run: 'herd link --no-interaction --secure {{ WORKSPACE_SLUG_KEBAB }}'41 - name: 'Refresh application data'42 type: workflow43 run: refreshrefresh.yamlis the workflow used to reset a local development environment for an existing workspace- runs fresh migrations
- empties the local S3 bucket
- clears the default queue
- wipes the Laravel log file
- runs the database seeder
1resource_type: workflow 2require_status: ready 3ending_status: ready 4sort_order: 1 5steps: 6 - name: 'Run fresh migrations' 7 type: shell 8 run: 'php artisan -vvv migrate:fresh' 9 - name: 'Empty S3 bucket'10 type: shell11 if: 'aws --endpoint={{ ENV_AWS_ENDPOINT }} s3api head-bucket --bucket {{ ENV_AWS_BUCKET }}'12 run: 'aws --endpoint={{ ENV_AWS_ENDPOINT }} s3 rm s3://{{ ENV_AWS_BUCKET }} --recursive --include="*"'13 env:14 AWS_ACCESS_KEY_ID: '{{ ENV_AWS_ACCESS_KEY_ID }}'15 AWS_SECRET_ACCESS_KEY: '{{ ENV_AWS_SECRET_ACCESS_KEY }}'16 AWS_DEFAULT_REGION: '{{ ENV_AWS_DEFAULT_REGION }}'17 - name: 'Clear the default queue'18 type: shell19 run: 'php artisan queue:clear'20 - name: 'Wipe logs'21 type: shell22 run: 'truncate -s 0 storage/logs/laravel.log'23 - name: 'Run database seeder'24 type: shell25 run: 'php artisan -vvv db:seed'down.yamlis the workflow used to tear down a local development environment for a workspace- empties the local S3 bucket (prerequisite for deleting it)
- deletes the local S3 bucket
- drops the MySQL schema
- removes the Laravel Herd site
1resource_type: workflow 2require_status: ready 3ending_status: suspended 4sort_order: 100 5steps: 6 - name: 'Empty S3 bucket' 7 type: shell 8 if: 'aws --endpoint={{ ENV_AWS_ENDPOINT }} s3api head-bucket --bucket {{ ENV_AWS_BUCKET }}' 9 run: 'aws --endpoint={{ ENV_AWS_ENDPOINT }} s3 rm s3://{{ ENV_AWS_BUCKET }} --recursive --include="*"'10 env:11 AWS_ACCESS_KEY_ID: '{{ ENV_AWS_ACCESS_KEY_ID }}'12 AWS_SECRET_ACCESS_KEY: '{{ ENV_AWS_SECRET_ACCESS_KEY }}'13 AWS_DEFAULT_REGION: '{{ ENV_AWS_DEFAULT_REGION }}'14 - name: 'Delete S3 bucket'15 type: shell16 if: 'aws --endpoint={{ ENV_AWS_ENDPOINT }} s3api head-bucket --bucket {{ ENV_AWS_BUCKET }}'17 run: 'aws --endpoint={{ ENV_AWS_ENDPOINT }} s3api delete-bucket --bucket {{ ENV_AWS_BUCKET }}'18 env:19 AWS_ACCESS_KEY_ID: '{{ ENV_AWS_ACCESS_KEY_ID }}'20 AWS_SECRET_ACCESS_KEY: '{{ ENV_AWS_SECRET_ACCESS_KEY }}'21 AWS_DEFAULT_REGION: '{{ ENV_AWS_DEFAULT_REGION }}'22 - name: 'Drop MySQL schema'23 type: shell24 run: 'mysql -h {{ ENV_DB_HOST }} -P {{ ENV_DB_PORT }} -u {{ ENV_DB_USERNAME }} $([[ -z "{{ ENV_DB_PASSWORD }}" ]] && echo "--skip-password" || echo "-p{{ ENV_DB_PASSWORD }}") -e "DROP DATABASE IF EXISTS {{ ENV_DB_DATABASE }}"'25 - name: 'Remove Laravel Herd site'26 type: shell27 run: 'herd unlink --no-interaction {{ WORKSPACE_SLUG_KEBAB }}'Claude Code in parallel
With these workflows in place, we can now easily manage our local development environments per workspace.
In a few clicks, we can:
- create a new workspace
- spin up the local development environment for the new workspace
- launch our favorite IDE or Terminal with a working directory of the workspace
This allows us to use Claude Code on different copies of the same project in tandem. While waiting for Claude Code to finish responding to one prompt, you can be prompting in another isolated environment for the same project.
Letting Claude Code drive LaborForest
Notice that the loop above still has you in it. You create the workspace, you click up, you launch the IDE, and only then does Claude Code get to work.
LaborForest can expose itself to AI agents over the Model Context Protocol, so the agent performs those actions instead.
Connecting Claude Code
The MCP server is off by default, and read only by default when you first switch it on. A third setting, shell command execution, starts at Deny — so turning read only off isn't on its own enough to let the agent run anything. All three live on the Settings screen, along with the port it listens on, which defaults to 9189.
With MCP enabled, the Settings screen shows an Add to Claude Code field. That one line is the entire registration — click it to copy, then run it:
1claude mcp add --transport http laborforest --scope user http://127.0.0.1:9189/mcp/laborforest --header "Authorization: Bearer <token>"Any client that speaks HTTP MCP connects to the same URL. The command carries the server's bearer token, so treat it like any other credential.
What the agent sees
The server publishes up to 14 tools, 6 resources and 3 prompts. How many tools depends on the two settings below; a server left at its defaults publishes two.
The resources are read-only JSON, and they're how the agent orients itself:
projectsandproject— every repository you've registered, and one of them by UUIDworkspaces— every workspace of a project, each with itspath,branch,statusandgit_statustemplate-variables— the mustache tags a command or workflow step acceptsworkflow-schema— the grammar of a workflow filesettings— your global configuration
The tools are the actions you'd otherwise click: find-project-by-path, add-project, add-workspace, add-workspace-example-workflows, run-workflow, validate-workflow, override-workspace-status, purge-workflow-logs, remove-project, the three launch-* tools, and the two that write configuration.
The prompts are author-workflow, convert-setup-to-workflow and diagnose-workflow-run.
Approving what the agent runs
Four of those tools run a command you wrote: run-workflow runs the steps of a workflow, and the three launch-* tools run the launch commands you configured. Everything else stays inside what LaborForest itself does — creating a worktree, reading a resource, writing a launch command into your settings — and none of what follows applies to it.
Those four are where you decide how much of the loop you actually want to give up. The Shell command execution setting offers three answers:
Allow— the agent runs them, no prompt, no interruptionRequire approval— the agent asks, and you decide, on the steps that touch your shellDeny— the four tools are not published at all, which is where a fresh installation starts
The middle one is the interesting one. Under Require approval, the tool call changes nothing at all. The agent gets back pending manual approval in application UI, LaborForest comes to the front, and a modal headed MCP action requires approval tells you which project and workspace it's for, which action was asked for, and then shows you the thing itself — the workflow file for a run, or the launch command for the other three.
What it shows is what will actually run, not what was written. The {{ }} tags are resolved first, ENV_ values included, read out of that workspace's own .env — so a launch command names the real directory and the real URL rather than the mustache tags from earlier in this article. When something in there can't be resolved yet, which is the normal case for an up workflow whose first step is what creates the .env, you get the file exactly as you authored it instead of a modal with holes in it.
Click Run workflow, or Execute command for a launch, and it runs, exactly as if you'd clicked it yourself in the app. Dismiss it and nothing happens — nothing runs, and nothing is written down. Either way the agent hears nothing more about it. It was answered the moment the call was parked, and there's no second message telling it you approved, dismissed, or wandered off.
Worth knowing: the agent can't change this setting. update-settings writes your launch commands and your step timeout, and deliberately doesn't accept the shell policy, so nothing connected to the server can lift its own gate.
In practice
Start work on a ticket. One prompt replaces the whole opening sequence of this article. add-workspace creates the worktree and branch without you, and if the project has no workflows yet, add-workspace-example-workflows seeds the bare, javascript or laravel starter set first. Then run-workflow and launch-ide are the two steps that actually run commands, so under Require approval they're the two that wait for you — you approve the up run against the workflow file the modal is showing, and approve the IDE launch, and the environment builds itself from there. Under Allow you skip both prompts and just watch it happen.
See what's already running. The workspaces resource hands back every workspace's branch, status and whether its working tree is clean, in a single read. That's the parallel-sessions picture from the top of this article, except the agent can see it too.
Tear down when a branch merges. The agent reads workspaces, runs your down workflow against the ones that are finished, and calls remove-project when a whole repository is no longer wanted. Its remove_directory and remove_worktrees arguments mean it can also just deregister a project and leave everything on disk.
Write the workflows themselves. Remember the brittle bash spaghetti from earlier? convert-setup-to-workflow reads what your project already documents — a README section, a Makefile, package scripts, a compose file — and splits it into the up, down and operational workflows that reproduce it. author-workflow writes a single one from a description of what it should do.
No tool writes a workflow file. The agent reads the workflow-schema resource, writes the YAML with its own file tools, and checks it with validate-workflow until it passes. Neither prompt runs the workflow to test it — starting a run stays your decision.
Heal a failed run. When a workflow fails, the workspace is left in error, and nothing runs while it sits there. diagnose-workflow-run sends the agent to the run logs in .laborforest/ignored/logs/, where the failing step is the one with a non-zero exitCode and every step after it is marked aborted. The agent fixes the cause, confirms the fix with validate-workflow, calls override-workspace-status to put the workspace back to ready or suspended, and runs the workflow again, without you touching the app.
A workspace whose run is still in flight can't be overridden, so an agent can't yank a status out from underneath a job that's still writing to it.
What it won't do
The server binds to 127.0.0.1 only. Every request needs the bearer token, the Host and Origin headers have to name the loopback interface, and there's a rate limit of 120 requests a minute.
Read only is the default, and it's strict: in that mode the server publishes exactly two tools, find-project-by-path and validate-workflow. Everything else is withheld from the tool list entirely, rather than published and then refused.
The shell policy works the same way. Under Deny the four tools that spawn a command aren't published either, so an agent that asks for one is told there is no such tool. Both defaults hold when the settings file itself can't be read: a file LaborForest can't parse is no evidence of a mode you chose, so it's answered with the narrower one, and you're left with the same two tools.
Turn read only off and a workflow step is arbitrary shell running under your own account. That's why the tools are annotated: run-workflow is marked destructive, along with remove-project, purge-workflow-logs and the two configuration tools, and a client that asks you to approve destructive calls will ask about those. The three launch tools deliberately carry no annotation at all: nothing in LaborForest changes, but they do run a command you configured.
That annotation is a request, though, not a gate. It's a hint to whichever client you connected, and it's that client's business whether to honor it. The shell policy from earlier is LaborForest's own, on LaborForest's side of the wire, and it doesn't depend on the agent or its client behaving — which is why turning read only off doesn't publish those four tools until the policy says so too.
Finally, run-workflow queues the run and returns a log ID immediately. It never returns step output, so you still watch the run in the app — which, if you've read this far, is the part worth watching anyway.
Conclusion
LaborForest is free and entirely open source. You can build from source, or grab the latest release binary for your Mac's architecture on the releases page.
Read the Docs
I encourage you to read the documentation included in the LaborForest repository.
Thanks for reading :)